The following instructions are designed to be compatible with the below VTech phones:
- VTech VSP715
- VTech VSP725 / VSP726
- VTech VSP735 / VSP736
- VTech VSP600
- VTech VCS754
Assign the MAC Address to a User
- Visit nextiva.com, and click Client Login to log in to NextOS.
- From the NextOS Home Page, select Voice.
- From the Nextiva Voice Administrator Dashboard, hover your cursor over Users and select Manage Users.
- Hover your cursor over the User where you want to assign the phone. Click the pencil icon that appears to the right.
- Open the Device section.
- Select Add Device.
- Select the VTech phone model you’d like to assign to the User from the Add Device drop-down list.
- Enter the MAC Address from the phone.
- Click Generate under the Authentication Name text box.
- Select the Change Password checkbox, and then click Generate under the Change Password text box.
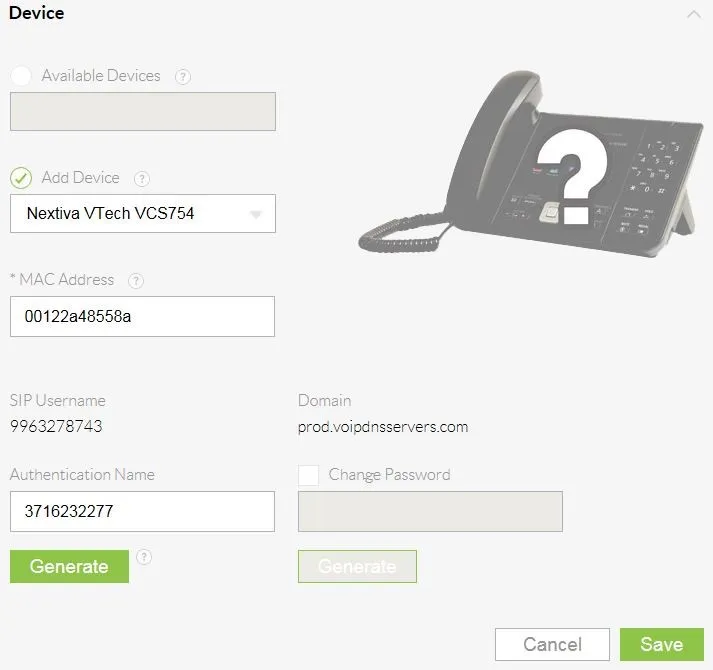
Users Tile - Click Save.
Finding the IP Address
Before you can enter the provisioning URL through the WebUI, you must know the IP Address of the phone.
- Press the Menu button.
- Scroll down and select Status.
NOTE: To select a menu option press the Select button.
- Select Network. The IP Address of the phone displays on the screen.
- Document the IP Address for future reference.
Entering the Server URL
Once you have the IP Address, you can access the WebUI from any computer on the same network as the phone.
- Navigate to the phone’s IP Address using your web browser.
- Log in with admin for the username and admin for the password. The System Status screen displays.
NOTE: If the phone does not accept admin as the password, the password prompt appears again. At this point, you will need to perform a factory reset (see How to factory Reset your VTech Phone for instructions).
- Click SERVICING at the top-left.
- Click Provisioning on the far-left side of the screen.
- Remove the contents of the Server URL text box, and then copy/paste to enter one of the following URLs based on your phone’s model:
- VTech VSP715: http://dm.nextiva.com/dms/Nextiva_Service_Provider/VTech_VSP715/
- VTech VSP725: http://dm.nextiva.com/dms/Nextiva_Service_Provider/VTech_VSP725/
- VTech VSP726: http://dm.nextiva.com/dms/Nextiva_Service_Provider/VTech_VSP726/
- VTech VSP735: http://dm.nextiva.com/dms/Nextiva_Service_Provider/VTech_VSP735/
- VTech VSP600: http://dm.nextiva.com/dms/Nextiva_Service_Provider/VTech_VSP600/
- VTech VSP754: http://dm.nextiva.com:80/dms/Nextiva_Service_Provider/VTech_VCS754/
- Scroll down and click Save.
- After the server URL has been entered, you need to reboot the phone by disconnecting the power supply and reconnecting it.