To skip to the section to disable SIP ALG click here.
To skip to the section to prevent Double NAT click here.
To skip to the section to enable Multicast click here.
To skip to the section to enter Nextiva’s Firewall Access Rules click here.
SonicWall devices are a relatively common business class hardware firewall/router device that allows for multiple WAN and LAN inputs, as well as other advanced features not commonly available for consumer class routers. There are two versions of operating systems on SonicWall devices.
SonicWall Standard OS (Legacy):
The legacy Standard OS can frequently have issues with blocking/disallowing traffic that should normally be accepted. This version of the SonicWall is not recommended or supported.
Sonicwall SonicOS:
SonicOS and SonicOSX are the current operating systems for SonicWall devices. These operating systems will work with Nextiva, provided they are configured correctly.
The configuration steps below solve a number of issues:
- SIP ALG: Disabling SIP ALG (SIP Transformations) prevents one-way audio, phone deregistration, and failed incoming calls
- Consistent NAT: Enabling Consistent NAT prevents one-way audio, failed transfers, dropped calls and Call Group inconsistencies
- Multicast: Enabling Multicast support ensures that simultaneous outbound calls are routed properly to prevent call failures, and inbound calls going to multiple devices (as in a Call Group) are routed properly
- Firewall Access Rules: Entering Nextiva’s Firewall Access Rules ensures that all traffic to and from Nextiva’s servers is allowed
NOTE: Due to the variety of software versions, the instructions below may not be entirely accurate, though should stay relatively consistent. Please ensure a Network Administrator familiar with the SonicWall device configures the settings below.
To Disable SIP ALG and Double NAT, and Enable Multicast:
- As a Network Administrator, log in to the SonicWall device through a web browser.
- Select the VoIP tab, typically located on the left navigational pane. To get to the settings below, you may need to also select Settings depending on the model of SonicWall you have.
- Check the Enable Consistent NAT setting checkbox, then uncheck the Enable SIP Transformations checkbox (Figure 1-1).
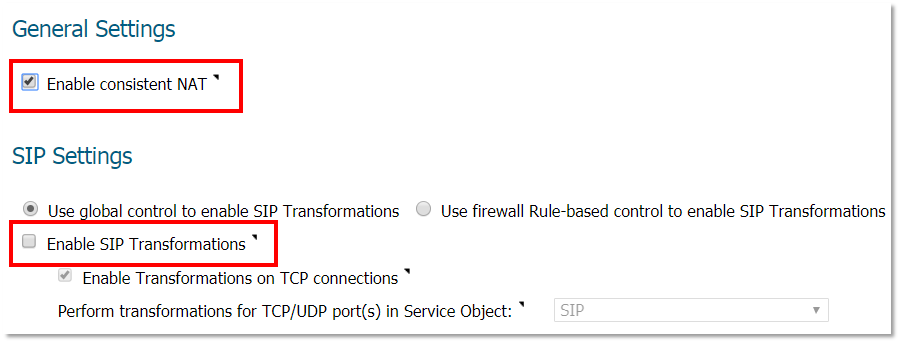 Figure 1-1: Consistent NAT and SIP Transformations
- Select the Firewall Settings tab, usually located on the left navigational pane.
- Select Multicast
- Ensure the Enable Multicast checkbox is checked.
- Ensure that the Enable reception of all multicast addresses radio button is selected (Figure 1-2).
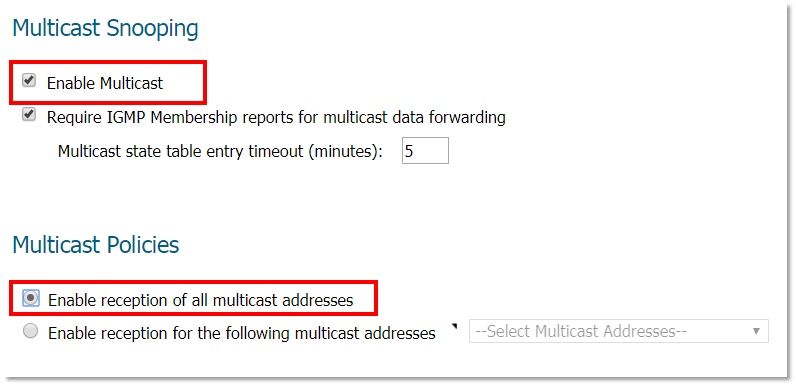 Figure 1-2: Enabling Multicasting
- Select the Network tab, usually located on the left navigational pane.
- Select Interfaces.
- Select the Edit or Pencil icon next to the WAN interface. The label will be Default WAN (Figure 1-3).
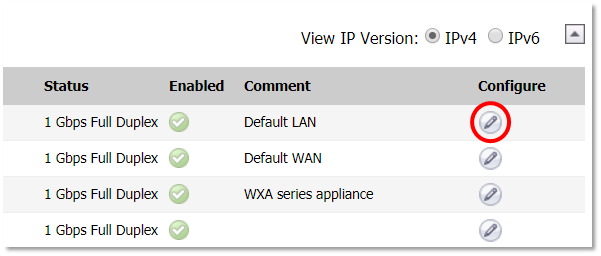 Figure 1-3: Editing WAN Interface
- Select the Advanced tab, usually located at the top of the window.
- Check the Enable Multicast Support checkbox (Figure 1-4).
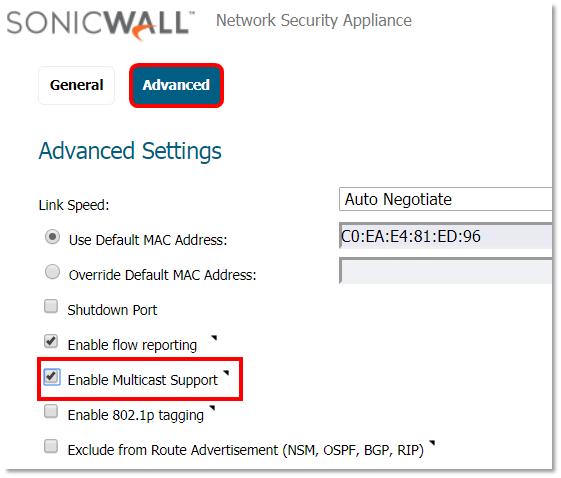
Figure 1-4: Enabling Multicast Support
- Repeat steps 11 – 12 for the LAN interface. The label will be Default LAN.
To Enter Nextiva’s Firewall Access Rules – LAN to WAN:
A total of four access rules will need to be created. Two access rules for LAN to WAN, and two access rules for WAN to LAN. Each rule will specify two different IP ranges for Nextiva service.
- Select the Firewall tab, then select Access Rules. The Access Rules setting may also be under the Policies section on the left navigation pane.
- Select the Matrix view, then select the arrow from LAN to WAN (Figure 2-1). On some versions of SonicWall, you may need to select Add on the following screen if a popup window does not display.
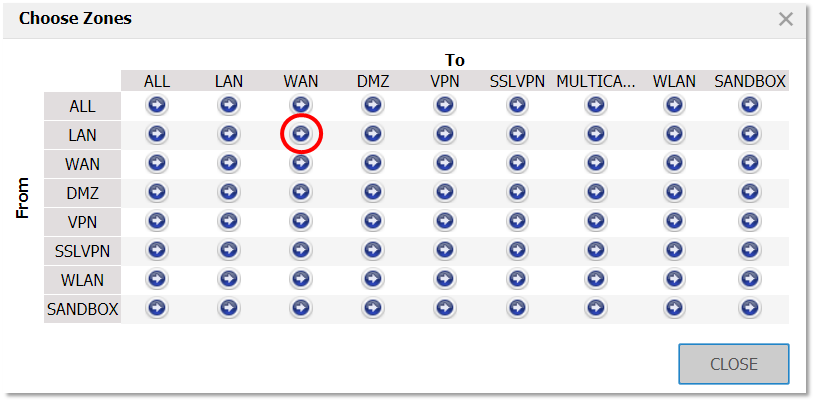 Figure 2-1: LAN to WAN Zone Selection
- Select the Destination drop-down menu, then select Create new network…
- Enter the information below, then select Save to close the window (Figure 2-2).
- Name: Nextiva 1
- Zone Assignment: WAN
- Type: Range
- Starting IP Address: 208.73.144.0
- Ending IP Address: 208.73.151.255

Figure 2-2: Nextiva IP Range 1 Creation
- Continue setup by selecting the following options (Figure 2-3).
- From: Any
- To: WAN
- Source Port: Any
- Service: Any
- Source: Any
- Destination: Nextiva 1 has populated
- All Other Fields: Leave as default
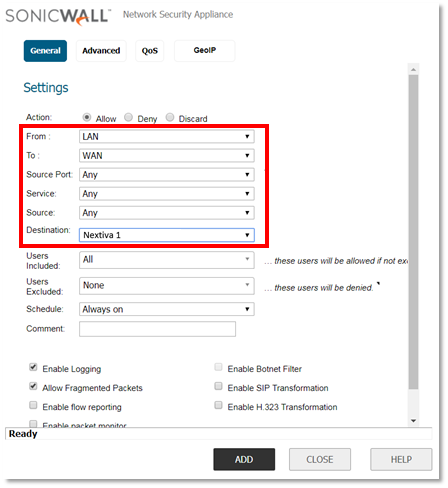
Figure 2-3: Access Rule 1 Creation
- Select the Advanced tab at the top of the window, then enter 90 in the UDP Connection Inactivity Timeout (seconds) field (Figure 2-4).
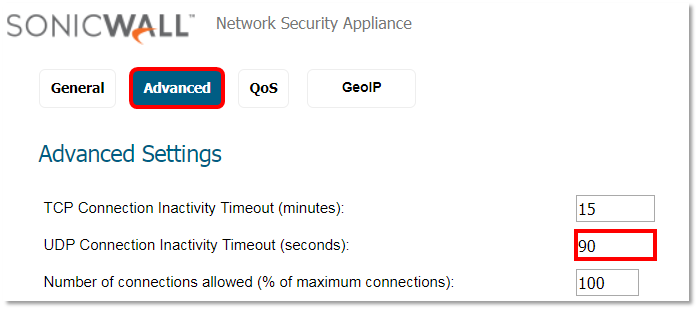 Figure 2-4: UDP Timeout Adjustment
- Select the QoS tab and use the drop-down menus to select the following options (Figure 2-5).
- DSCP Marking Action: Explicit
- Explicit DSCP Value: 46 – Expedited Forwarding (EF)
- 802.1 Marking Action: Explicit
- Explicit 802.1p Value: 6 – Voice (<10ms latency)
 Figure 2-5: QoS For Voice Calls Configuration
- Select Add or OK to save the first Access Rule.
- Select the Matrix view again, then select the arrow from LAN to WAN to enter the second IP range. This will be the exact same process as above with the second set of Nextiva’s IP ranges.
- Select the Destination drop-down menu, then select Create new network…
- Enter the information below, then select Save to close the window.
- Name: Nextiva 2
- Zone Assignment: WAN
- Type: Range
- Starting IP Address: 208.89.108.0
- Ending IP Address: 208.89.111.255
- Continue setup by selecting the following options from the drop-down menus:
- From: Any
- To: WAN
- Source Port: Any
- Service: Any
- Source: Any
- Destination: Nextiva 2 has populated
- All Other Fields: Leave as default
- Select the Advanced tab at the top of the window, then enter 90 in the UDP Connection Inactivity Timeout (seconds) field.
- Select the QoS tab and use the drop-down menus to select the following options.
- DSCP Marking Action: Explicit
- Explicit DSCP Value: 46 – Expedited Forwarding (EF)
- 802.1 Marking Action: Explicit
- Explicit 802.1p Value: 6 – Voice (<10ms latency)
- Select Add or OK to save the second Access Rule.
Continuing Setup with Nextiva’s Firewall Access Rules – WAN to LAN:
- Select the Matrix view, then select the arrow from WAN to LAN (Figure 3-1). On some versions of SonicWall, you may need to select Add on the following screen if a popup window does not display.
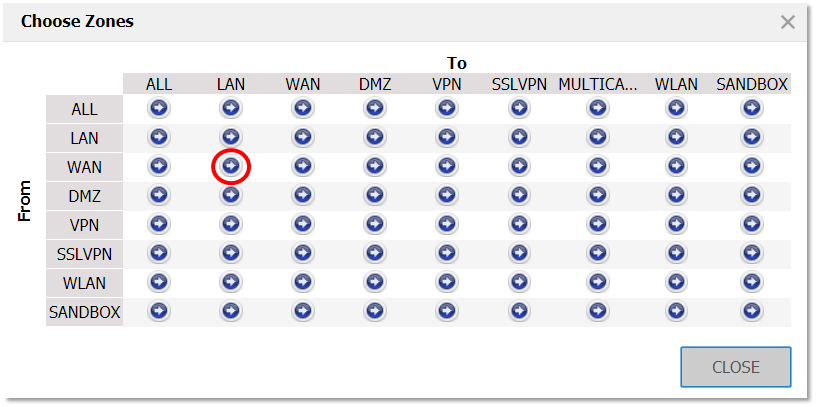 Figure 3-1: WAN to LAN Zone Selection
- Select the following options from the drop-down menus:
- From: Any
- To: LAN
- Source Port: Any
- Service: Any
- Source: Nextiva 1
- Destination: Any
- All Other Fields: Leave as default
- Select the Advanced tab at the top of the window, then enter 90 in the UDP Connection Inactivity Timeout (seconds) field.
- Select the QoS tab and use the drop-down menus to select the following options.
- DSCP Marking Action: Explicit
- Explicit DSCP Value: 46 – Expedited Forwarding (EF)
- 802.1 Marking Action: Explicit
- Explicit 802.1p Value: 6 – Voice (<10ms latency)
- Select Add or OK to save the third Access Rule.
- Select the Matrix view again, then select the arrow from WAN to LAN to enter the second rule.
- Select the following options from the drop-down menus.
- From: Any
- To: LAN
- Source Port: Any
- Service: Any
- Source: Nextiva 2
- Destination: Any
- All Other Fields: Leave as default
- Select the Advanced tab at the top of the window, then enter 90 in the UDP Connection Inactivity Timeout (seconds) field.
- Select the QoS tab and use the drop-down menus to select the following options.
- DSCP Marking Action: Explicit
- Explicit DSCP Value: 46 – Expedited Forwarding (EF)
- 802.1 Marking Action: Explicit
- Explicit 802.1p Value: 6 – Voice (<10ms latency)
- Select Add or OK to save the final Access Rule.