There are three types of Call Centers configurable through the wizard:
- Call Queuing (Basic): Comes with features like entrance announcement, call distribution policies and inbound call information. Voicemail and forwarding are also included features.
- Call Center Pro (Standard): Comes with all Basic features and ACD sign in and sign out functions, as well as additional support for optional features like call recording, and Supervisor Dashboard.
- Call Center Enterprise (Premium): Supports all features of Call Center, with advanced features like inbound DNIS, and silent monitoring.
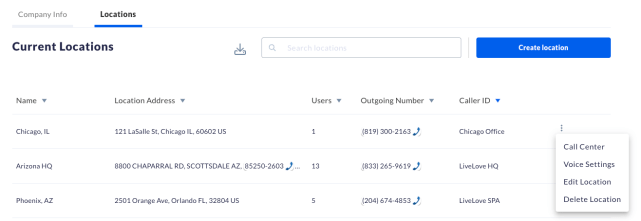
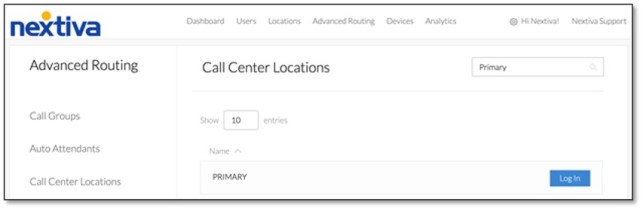
Navigating to Call Center from NextOS (If purchased after Dec. 2020)
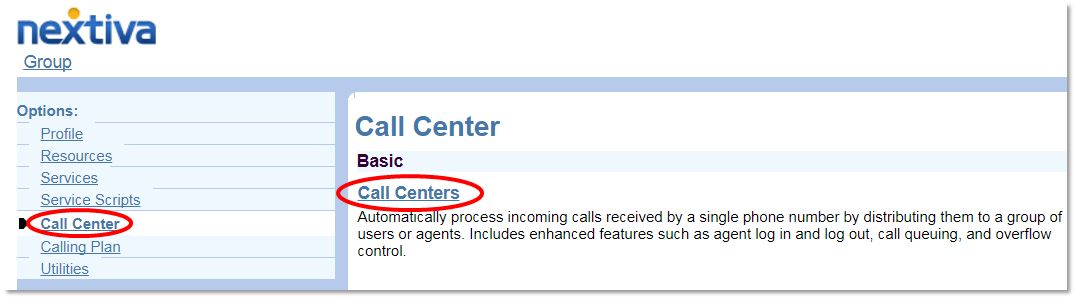
Navigating to Call Center from Nextiva Voice (If purchased before Dec. 2020)
Once the Configuration Portal launches in a new tab, select Call Center on the left Navigation Pane, then select Call Centers under the Basic column.
You will see a list of Call Centers on the next page. To begin the Call Center Wizard, click the Add Call Center Wizard button.
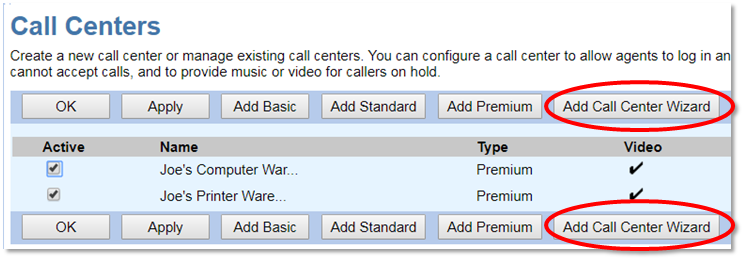
Select the Basic radio button, then click Next. The next screen will be the first of a three-step process to configure the new Call Center.
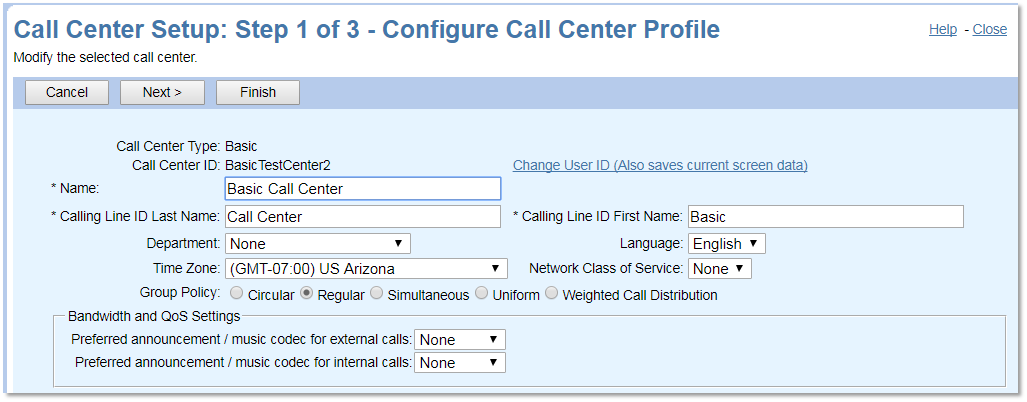
- Call Center ID: This unique ID assists in routing calls. The Call Center ID needs to be alpha-numeric with no special characters and no spaces.
- Name: A friendly name for the Call Center.
- Calling Line ID: When someone calls the Call Center, this is the name displayed on the receiving agent’s device.
- Initial Password: This password will be used with third-party integration services.
- Department: Gives administrators the ability to departmentalize their phone system, a key component to Unity.
- Language: Currently English is the only language package Nextiva has available.
- Time Zone: Used for scheduling functions, reporting, and time-dependent call routing.
- Group Policy: Controls how incoming calls will ring to agents. There are five different types to choose from:
- Circular: Sends the calls to agents one at a time, moving down the list of agents until someone answers. The next call will start ringing the agent where the last call left off.
- Regular: Rings the agents one at a time, always trying the agent at the top of the list and working its way down.
- Simultaneous: Rings all of the agents at the same time.
- Uniform: Agent phones ring one at a time in the order of idle time. The Call Center offers the next call to the agent who has been off the phone the longest.
- Weighted Call Distribution: Assigns each agent a percentage. The Call Center will then try to distribute the calls based on the configured agent percentages.
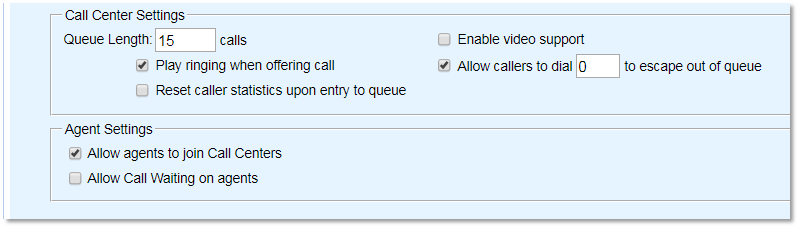
Additional settings on this screen include:
- Queue Length: This limits the number of people that can wait in queue for an agent. Calls will follow overflow treatment when the queue length is reached. Basic Call Centers can have a maximum of 25 callers in queue.
- Enable Video Support: This feature is not supported.
- Play Ringing When Offering Call: Once an agent becomes available, the caller will hear ringing instead of hold music while the call connects.
- Allow Callers to Dial “0”: If a caller presses 0, they will hear the Call Center voicemail. Configuring the Call Forwarding Busy option inside of the Call Center changes this option. When deselected, nothing will happen when the customer presses 0.
- Reset Caller Statistics: Resets an internal timer that tracks how long a caller has been waiting in the queue when transferring calls from one Call Center to another using Overflow or Bounce routing policies.
- Allow Agents to Join Call Center: Call Center agents can join and remove themselves from their assigned Call Centers.
- Allow Call Waiting on Agents: Sends calls to agents who are already on a call.
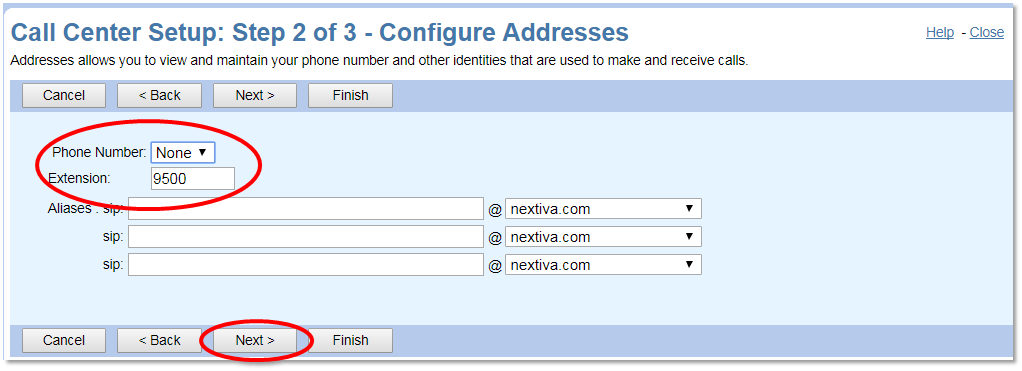
After finishing filling out the required fields, select the Next button. To reach the Call Center, you will need to assign an extension. Additionally, a direct phone number can be assigned to the call center so it can be reached from outside your organization
To assign agents, click the Search button in the upper-right to bring up all of the Agents in the Group that can take calls. Select the Agents desired and click the Add button. The Agents move from the Available Agents field to the Assigned Agents field.
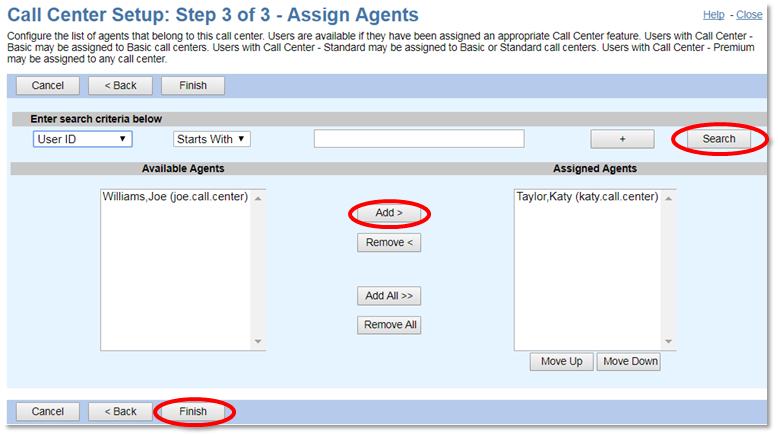
Click Finish to create the Call Center. Your Call Center is now set up and configured! The next steps include configuring Announcements and having Agents join the Call Center.