Bria is a business-class mobile application provided by CounterPath. It is not a free program, and when installing it you will need to have a license key from CounterPath. If you have purchased Bria, use the steps below to connect it to your Nextiva service:
Once you have installed the Bria application on your iPhone, run the program. Follow the below steps to complete the setup process in the Bria application on your iPhone.
Setting Up Bria for iPhone:
- Visit nextiva.com, and click Client Login to log in to NextOS.
- From the NextOS Home Page, select Voice.
- From the Nextiva Voice Admin Dashboard, hover your cursor over Users and select Manage Users.
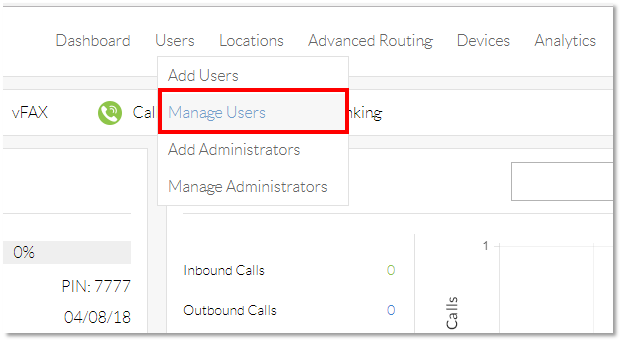 Manage Users
- Hover your cursor over the user you are assigning Bria to, and click the pencil icon that appears to the right of their name.
 Edit User
 - Scroll down, and click the Device section.
- Select the Own Device radio button.
- Select Generic SIP Phone from the drop-down list of the Own Device list.
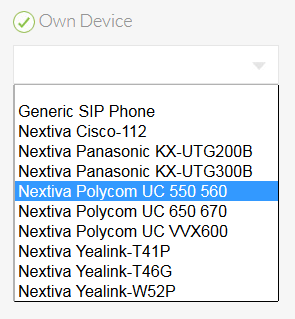 Device Drop-down
 - Click the green Generate button under the Authentication Name text box.
- Select the Change Password checkbox under the Domain.
- Click the green Generate button under the Change Password checkbox. Copy the SIP Username, Domain, Authentication Name, and Password onto a notepad, or document them in some way, as they will be important in setting up Bria.
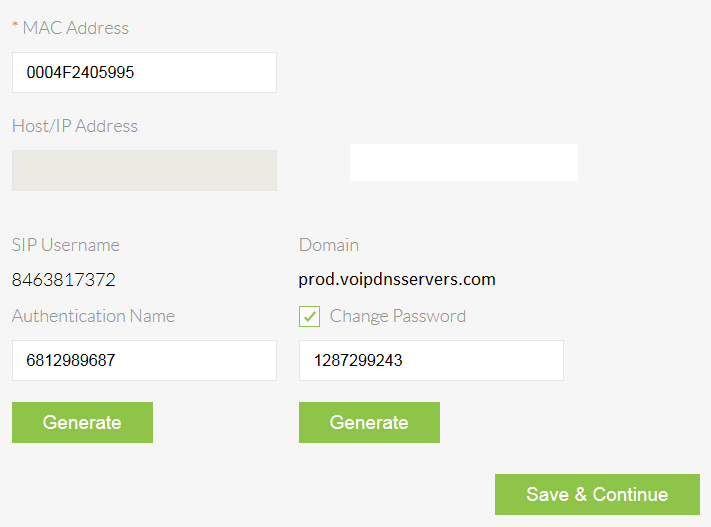 Device Details
 - Click Save & Continue. A pop-up message appears indicating the transaction has been processed.
 Confirmation Popup
 - Install Bria on your iPhone.
- Once you have opened the Bria application on your iPhone, you will see an icon in the shape of two gear sockets connected together in the bottom right corner of the screen. Select this icon to access the Settings menu.
- You will see various options within the Settings menu. Tap the option labeled Accounts.
- At the top of the screen, you will see an option labeled Accounts +. Tap this option to create a new account through Bria.
- Avoid selecting any of the predefined criteria of another provider. Select SIP Making Calls.
- Enter the necessary criteria found in the NextOS Voice Portal to provision Bria. Have your user information available before moving to the next steps.
- Account Name: Enter “Nextiva” or any description you would like to use as your account name.
- Display As: You can enter anything in this field and it will typically show up as an “internal caller ID setting” when dialing another user or extension within your Nextiva account.
- Username: This was created when you established the user in the NextOS 3.0 portal. You can Edit your user and click on Edit under Assigned Devices to obtain these credentials. Your username will be labeled as “SIP Username” in the NextOS 3.0 portal.
- Password: This will also be defined under the Edit section of your user in the NextOS 3.0 portal. If it is not clearly visible in the portal, select Reset Authentication Password and press the Generate button. A new password will be created, and before submitting, enter the defined criteria into Bria.
- Domain: Your domain should be listed as prod.voipdnsservers.com when connecting Bria to a Nextiva account.
- VM Number: Your voicemail number should be entered as 9999.
- Proceed by clicking on Account Advanced.
- Outbound Proxy: This should be listed as prod.voipdnsservers.com:5062
- Authorization Name: The authorization name will also be found in the Nextiva Voice portal, along with the information of the SIP Username and Domain. In the portal, this will be labeled as “Authentication Name.”
- Select the Back option and return to the Accounts menu.
- In the upper left corner of the screen, select the Accounts button.
- Proceed by tapping the Preferences button.
- Within the “Mobile Data Network”, turn the following two settings to “On”:
- Use When Available
- Allow VoIP Calls
- In the upper left corner of the screen, select the Accounts button to return to the Accounts page.
- Select the blue arrow to the right of your Nextiva account.
- At the top of the menu, select the button labeled Register.
- The application will display Registered if all of the necessary credentials have been met.
- Place a test call to confirm Bria has been successfully connected to your Nextiva account by selecting the Phone icon at the bottom of the Bria menu.
Need additional help? Click here.