Call Me Now allows someone browsing your website to click a web-based link or icon to initiate a Nextiva call. Once someone has entered their own phone number, a call will immediately be initiated from your Nextiva phone to the number entered. This functionality can be thought of as a reverse click-to-dial.
Click Here for User Instructions
To Set Up Call Me Now as an Administrator:
- Visit www.nextiva.com, and click Client Login to log in to NextOS.
- From the NextOS home page, select Voice.
- From the Nextiva Voice Admin Dashboard, hover your cursor over Users and select Manage Users.
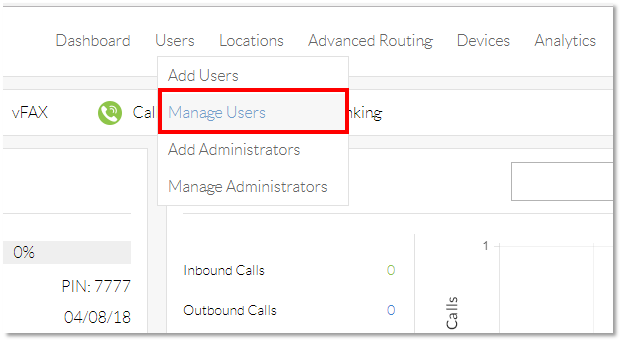
Manage Users
- Hover your cursor over the name of the user you want to configure Call me now for, and click the pencil icon to the right.
 Figure 1-2: User Edit
- Scroll down, and click the Permissions section to expand the menu.
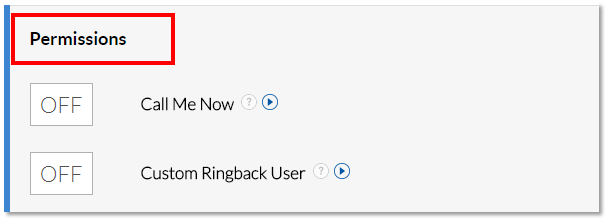 Permissions Section
- Click the pencil icon to the right of Call me now.
 Call Me Now Edit
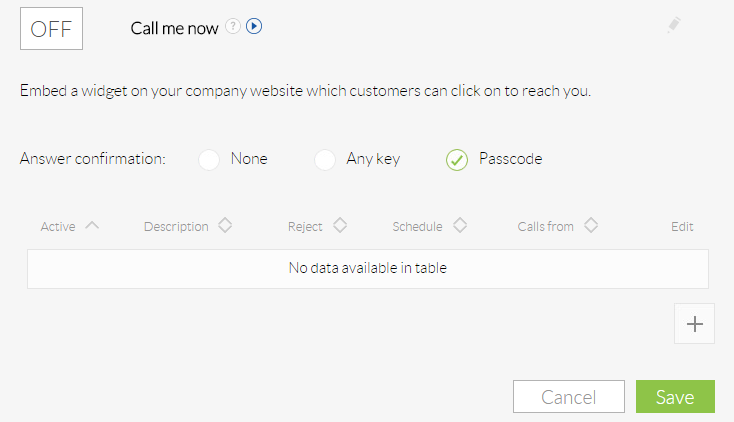
- Select the Answer confirmation setting, based on the information below:
- Passcode: The default option, and requires that the voicemail PIN be entered in order to answer the call.
- Any key: Requires a key to be pressed to answer the call and speak with the end user.
- None: Does not require a passcode or key to be pressed to answer the call.
- Click the green Save button on the bottom-right of the Call me now menu. A pop-up message will appear confirming the Call me now settings have been updated.
 Confirmation Pop-Up
- Make sure the ON/OFF button is set to ON for Call me now. If it is set to OFF, click the button to change the setting to ON.
Specifying Criteria
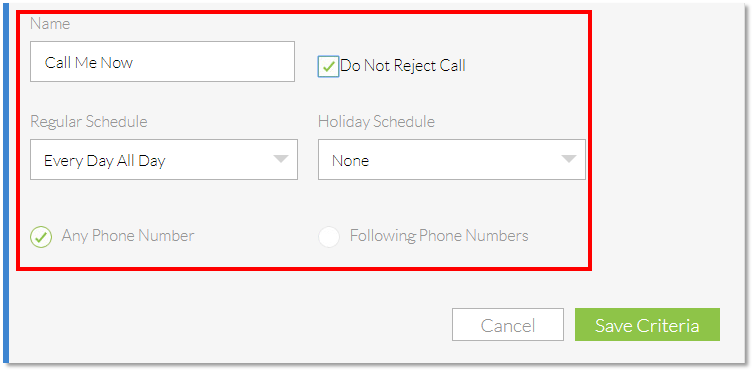
- Click the plus sign on the bottom-right of the Call me now menu to specify criteria to be used for the Call me now feature. These criteria allow you to specify whether calls should or should not be made from the phone, based on the time of day, and the number that was entered on the website.
 Call Me Now Criteria
- Enter the required information as indicated below:
- Name: A description for the criteria. If calls will only be made using Call me now during business hours (see additional options below) then enter “Business Hours”.
- Do not Call: Select this box to not have a call automatically placed from your phone when the criteria is met.
- Regular Schedule: Allows you to specify a schedule for when calls should or should not be made from your phone, depending on whether the Do not Call check box is selected.
- Holiday Schedule: Allows you to specify a holiday schedule for when calls should or should not be made from your phone, depending on whether the Do not Call check box is selected.
- Any phone number: Makes calls to any phone number that follows the criteria specified above.
- Following phone numbers: Makes calls only to certain numbers that follow the criteria specified above.
- Specific number: Allows you to specify specific phone numbers that should follow the criteria specified above. This setting is only available if the Following phone numbers radio button is selected. To add multiple numbers, click the plus sign next to the Specific number text box.
 Call Me Now Options
- Click the green Save button at the bottom of the Call me now menu. A pop-up message will appear confirming the Call Me Now Settings have been added.
Confirmation Pop-Up
API
Nextiva cannot provide support for any API commands or setup, but we can provide a starting place to integrate Call Me Now within your website.
There is a Call Me Now API command that will allow a web developer to integrate the Call Me Now into your website. The following must be sent as POST to our server with USERID and NUMBER replaced with the User ID (including @nextiva.com) of the account that Call Me Now is connected to and NUMBER replaced with the number the Call Me Now should connect to.
If you have any questions, contact our Support Team here or email us at support@nextiva.com.
To Set Up Call Me Now as a User:
Call Me Now allows someone browsing your website to click a web-based link or icon to initiate a Nextiva call. Once someone has entered their own phone number, a call will immediately be initiated from your Nextiva phone to the number entered. This functionality can be thought of like a reverse click-to-dial.
- Visit www.nextiva.com, and click Client Login to log in to NextOS.
- From the NextOS home page, select Voice.
- From the Nextiva Voice Admin Dashboard, click the pencil icon to the right of Call Me Now in the My active features tile, or click the blue All features button at the bottom right of the tile if it is not listed.
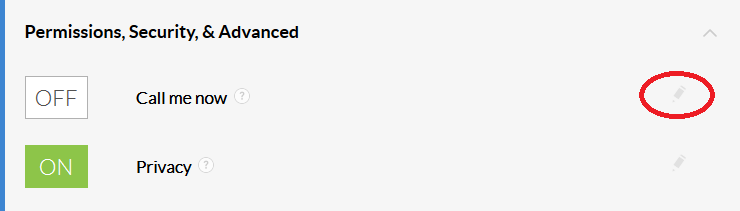
- Click the Permissions, Security, & Advanced section.
- Click the pencil icon to the right of the Call me now option.
- Select the Answer confirmation setting, based on the information below:
- Passcode: This is the default option, and requires that the voicemail PIN be entered in order to answer the call.
- Any key: This option requires a key to be pressed to answer the call and speak with the end user.
- None: This option does not require a passcode or key to be pressed to answer the call.
 Call Me Now
- Click the green Save button on the bottom-right of the Call me now menu. A pop-up message will appear confirming your Call me now settings have been updated.
- Make sure the ON/OFF button is set to ON. If it is set to OFF, click the button to change the setting to ON
To Set Up the Call Me Now Link:
- Go to Call Me Now Setup
- Enter the user ID you use to log in for access to your user-level settings. Make sure you add @nextiva.com (i.e. username@nextiva.com) to the end of your username.
- Click Generate to create the link. You’ll want to take this link and embed it on your website.
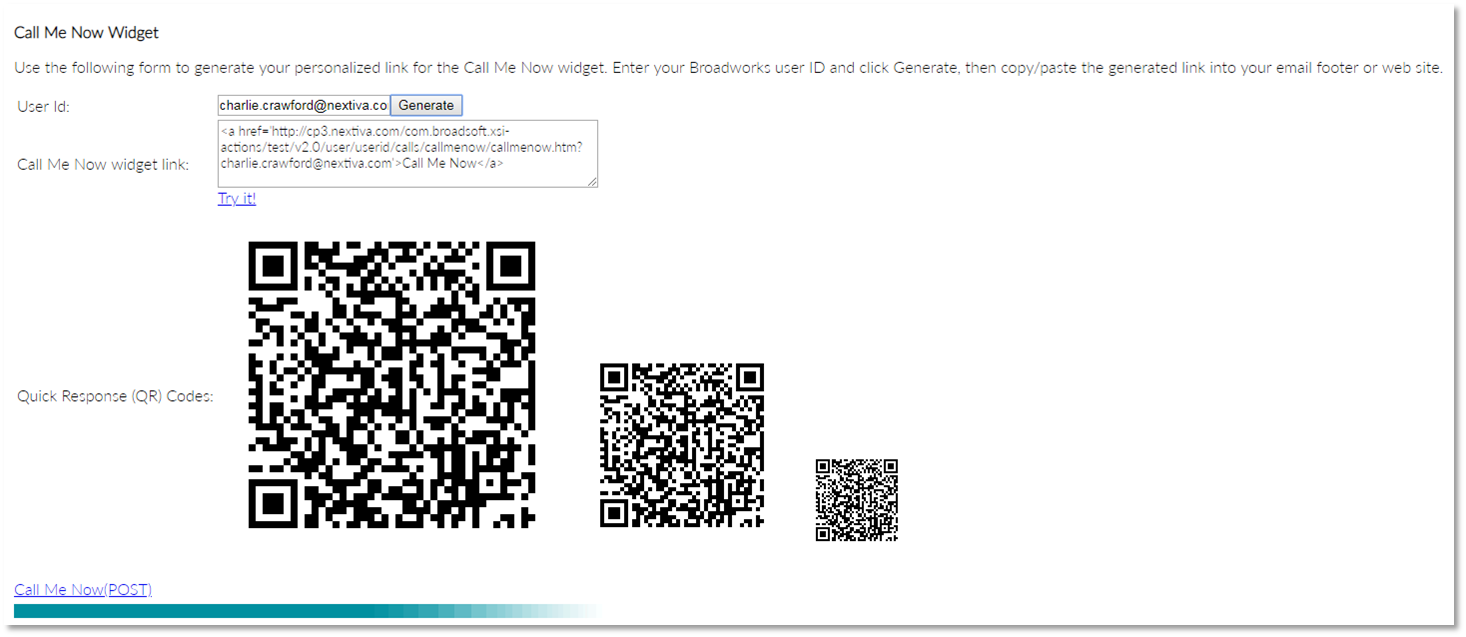 Call Me Now Widget