Customizing forms and fields in Nextiva CRM

⚠️ Nextiva CRM has been retired from the Nextiva product offerings and is currently not available to new users. 

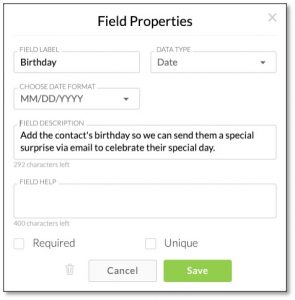
Forms consist of multiple fields that are required or available when creating a new record in Nextiva CRM. For example, when creating a new contact in Nextiva CRM, it might be necessary to include a name and phone number, but you also have the option to add an email and mailing address. Customize the forms to include the fields that best fit the business needs. 


Creating forms 

From the NextOS admin dashboard, select Service > Forms and Fields. 

Click Plus (+) > enter the new form name and choose the associated table > Apply.

Perform any of the below actions > Save & Go Live

  1. Edit form name
  2. Choose the departments that can use this form
  3. Edit form and field requirements:
    1. To reposition, click-and-drag fields 
    2. To edit the section name, click the Pencil icon
    3. To set a field as required, lock a field, or remove a field, click the Gear icon
  4. Add new sections (click-and-drag) 
  5. Create new fields. Click here for more information. 
  6. Add basic fields to sections (click-and-drag) 
  7. Delete form

Creating fields

Click Create Field > enter the Field Properties below > Save.

  • Field Label: The field title displayed in the form (i.e. Name, Phone Number, Email).
  • Data Type: How the data will appear in the field (i.e., Date, Currency, Radio Button).


Need additional help? Click here.

Was this article helpful?